Chapter 7, Part 6
Building the Bottom Bracket Assembly
Version 1.2
Written by Rickey M. Horwitz
Notice
The material contained in this section is protected by U.S. copyright laws. Any unauthorized duplication or publication of the material contained in this section is prohibited by law.
Tools Required:
Material required:
Building the Bottom Bracket Shell
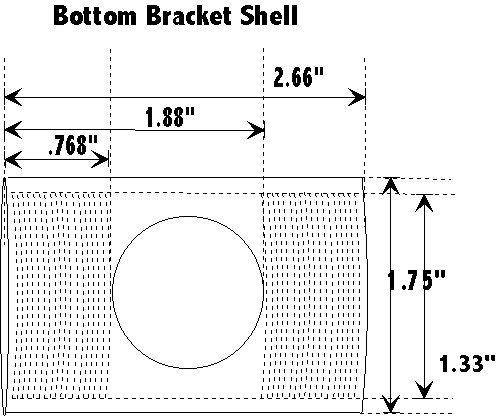
The bottom bracket shell is a 68 mm (2.66") long, thick tubular structure that contains a 1 3/8"x 24 pitch machine thread on both ends. On the right end, a left-hand thread is used. The bottom bracket can be fabricated from any type of 6061 T6 aluminum, as long as the stock is 68 mm wide, has an I.D. of 1.33" and a wall thickness of .180" to .250". Once these dimensions are achieved, the applicable threads can be machined. For those not having the resources, this threading can be accomplished by a bicycle shop. Once the bottom bracket shell is machined and threaded, drill a 1-1/8 inch hole directly in the middle of the shell. For good results use a hole saw. Refer to the illustration below.
Building the Derailleur Tube
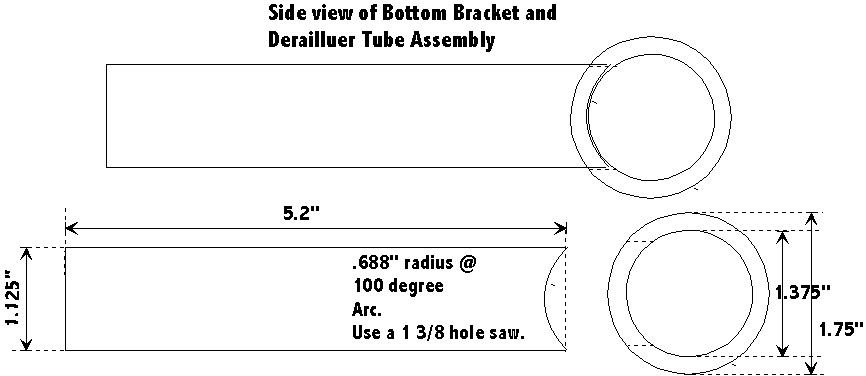
The Derailleur Tube consists of a 5-1/2 inch long 1-1/8 inch diameter tube. This tube is ultimately inserted into the Bottom Bracket Shell and welded. However, for proper fitting the tube must first be mitered with a 1-3/8 inch hole saw as illustrated below.
Welding the Derailleur Tube to the Bottom Bracket Shell
Clean both parts using a stainless steel brush. Referring to the illustration below, insert the Derailleur Tube into the 1-1/8" hole in the Bottom Bracket Tower. Insure that the tube is flush inside the shell and that no obtrusions exist. Using a TIG welder, carry a bead along 360 degrees of the derailleur tube. Place most of the heat on the shell as the greater mass absorbs the most heat.
Building the Bottom Bracket Main Tube
The main tube uses a 12" long 1-3/4" tube. At the end of the tube, a 1-3/4" miter is made using a hole saw. Insure that the miter contains the arc as shown in the illustration below.
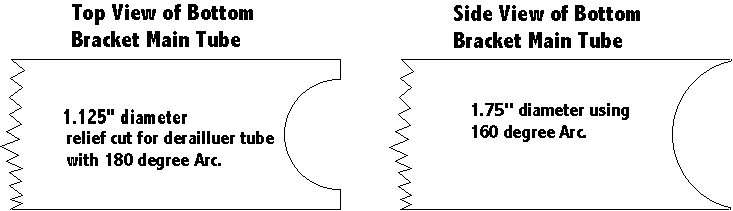
90° from the 1-3/4 Miter axis, miter a 1-1/4" miter as shown in the illustration above. This miter relief allows accommodation for the Delrailleur Tube.
Welding the BB Shell/Derailleur Tube to the Main Tube
It is assumed that all parts have been thoroughly cleaned for welding. If not, do so now!
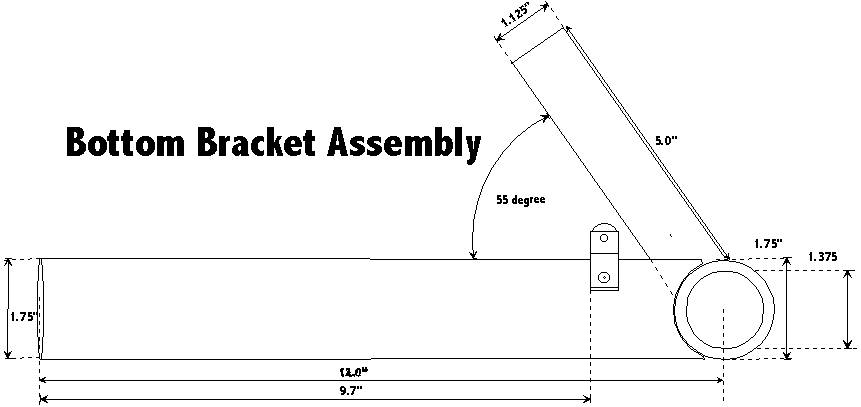
Alignment is critical in this step. Therefore, use extreme caution in aligning the shell to the main tube. The derailleur tube should be oriented at 55° in relationship to the main tube (refer to the illustration below).
Note
Insure that the left-hand thread is facing the right side of the Bottom Bracket assembly!
Some filing may be required to achieve this orientation. Insure that the face of the BB shell remain at a parallel relationship with the BB Main Tube. Again, some filing may be required. Once all parts are fully aligned, inspect the intersections of all parts and verify no gaps greater than .10" exist. Once this and other mentioned contingencies have been achieved, the assembly is welded together. Since the assembly is rather complex, it is best to perform a tack weld on four corners. Once these tack welds have been made, recheck the geometry to insure that it has remained intact. Weld the remaining assembly together, including the Derailleur tube to the BB Main Tube. The bead must be contiguous around the entire 360° of the assembly.
Post Work
Once this assembly has been completed, it must undergo a post heat treatment and painting. Insure during painting that the Bottom Bracket Threads do not get painted.
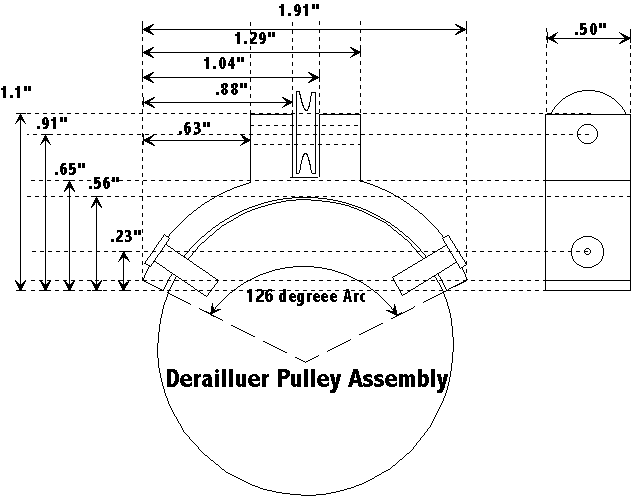
Building the Derailleur Pulley Assembly
The Derailleur Pulley Assembly allows a way to route the derailluer cable without adding friction.
This assembly is constructed from delrin. For simplistic construction, much of the fabrication can be done by rough cutting the delrin into the basic geometry and sanding it into the desired shape. However, for proper main tube fitting, a 1-3/8 inch hole saw cut is recommended. Once this fabrication is shaped as shown below, drill the pulley axle using a #32 drill bit. Prior to assembly check to insure that the 1/8 inch Roll Pin turns freely inside the ½" pulley. Drill or ream as required. An oversized hole in the pulley is OK. Situate the pulley into the base so that all holes align. Push the Roll Pin into the base on either side. A pair of pliers maybe required to push this pin all the way through.
Installing the Derailleur Pulley Assembly to the BB Main Tube
Situate the Pulley assembly as shown in the illustration. For exact placement the actual front derailleur should be installed. Observe the derailleur cable line and situate the pulley accordingly. Using Crazy Glue or 5 minute epoxy apply to the bottom base of the Pulley assembly and situate as desired on the BB Main Tube. Once the glue has dried, drill a 1/8" hole on both sides of the Derailluer Pulley base (as shown in the illustration). This hole is drilled through the Pulley base and completely through BB Main Tube. Insert the Stainless Steel Pop Rivets into each of the tool holes and secure using the Pop-riveting Tool.