Chapter 7, Part 1
Fabricating the Main Tubes Sections
Version 4.0
Written by Rickey M. Horwitz
Notice
The material contained in this section is protected by U.S. copyright laws. Any unauthorized duplication or publication of the material contained in this section is prohibited by law.
Introduction
This section focuses on building the main tube section of the Thunderbolt. The main-tubes consist of .065 inch thick 2-inch diameter tubing. If a post heat treat is not performed the tube wall thickness should be increased to .083 inches or thicker. Included with the two inch tubing, is the fabrication of the pinch collets, idler/steering mounts and knuckle faceplates. This section accounts for the bulk of the trike.
Required Materials
The following materials are required for this section:
Required Tools
The following tools are needed to conduct this section:
Objective
This section covers the following accomplishments:
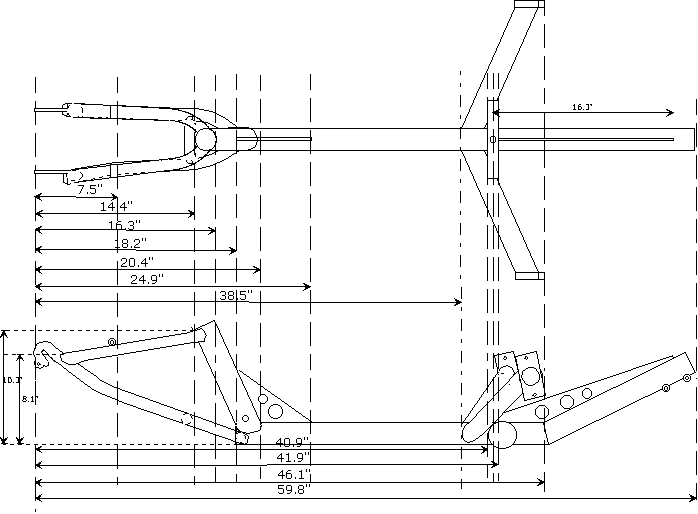
The completed assembly drawings (including the sheetmetal) are shown below along with all applicable angles and dimensions.
Note
The drawing below is the Standard Thunderbolt with 114° Cross-members
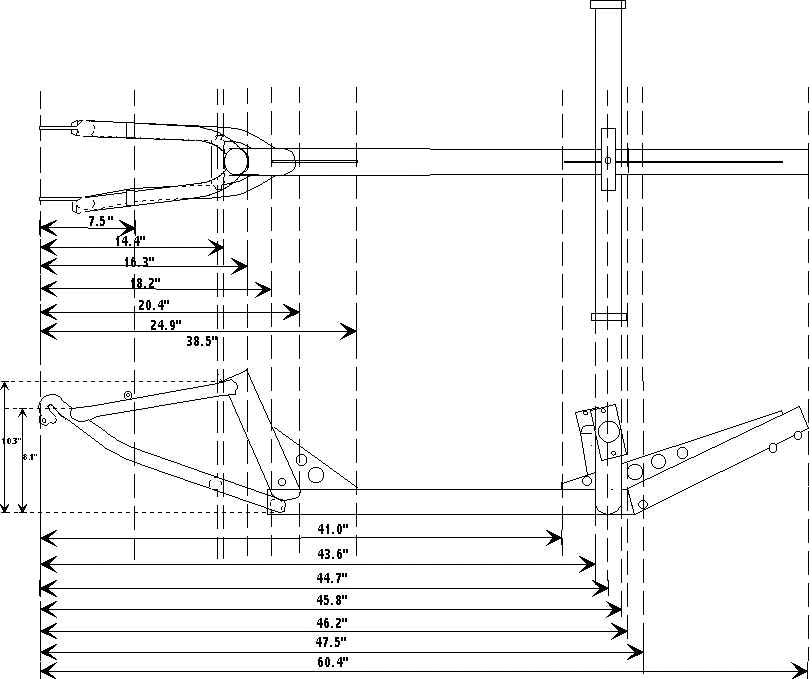
Note
The alternate 90º cross-member Thunderbolt is shown below.
Building the Bottom Bracket Pinch Collets
Two Pinch Collets are used to secure the Bottom Bracket Boom to the Forward Tube. The Pinch Collets are machined as follows:
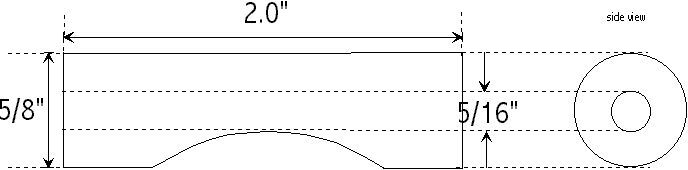
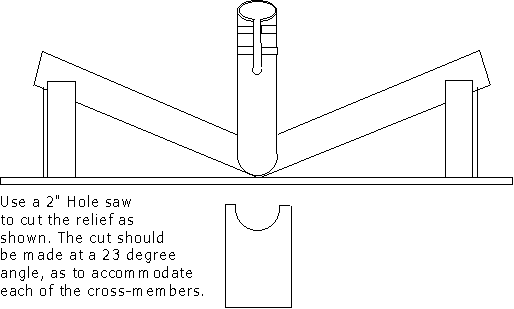
The 2-inch radius, shown above, is cut using a 2-inch hole saw.
Chain Idlers and Steering Mount Fabrication
Both chain idlers and Bell Crank mount use 1/2-inch diameter aluminum rod. The rod lengths used for the idler's mounts are cut at 2 inches as to span the diameter of the 2-inch frame tubes. If OSS is desired, a Bell Crank Mount is required. This mount uses a 3-inch length of 1/2" diameter rod. A .272-inch hole is drilled (using an 'I' size drill) lengthwise through all three rods. These holes are tapped to accept a 5/16x24 thread. The tap should thread at least 1" into each of the mounts.
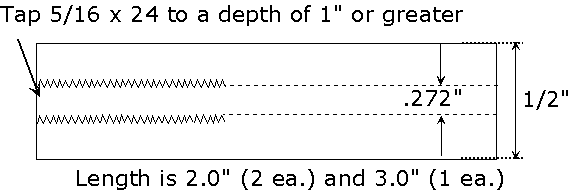
If Under Seat type steering is desired (USS), a steering mount is required. This mount is fabricated from 5/8" diameter aluminum rod that is 2.25" inches in length. A .3680" hole is drilled through the entire length using a #U drill bit. The mount is finally tapped using a 7/16"x14 TPI tap. This tap should cut to a depth of 1.25 to 1.5 inches.
Building the Cross-Members
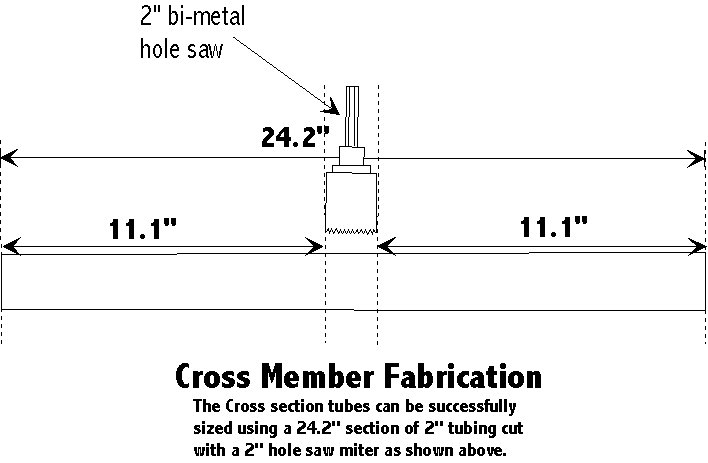
The Cross-Member Tubes require a 26-inch section (actually 25.2") of 2-inch tubing. Each end of this tube should be cut to an exact flush, right angle. Instead of cutting the 26-inch in half to make each of the cross-members, we are going to intersect it using a two-inch hole saw. To make things increasingly challenging, the hole saw shall cut at a 66° angle. See the picture below for details. When the hole has been successfully drilled, two identical pieces should exist. These are the cross-members. If by chance one of the cross members is longer, it must be trimmed so that both pieces are exactly the same length. The exact length to the prescribed specification is not as important as making both cross-members equal lengths. Refer to the illustration below for instructions on building these assemblies.

If the 90° Cross-Member Assembly is desired, follow the simple instructions in the illustration below:
Building the Knuckle Backplates
The Knuckle Backplates interface the steering knuckles to the cross-members. Two of these parts are required. To build these parts refer to the drawing below.
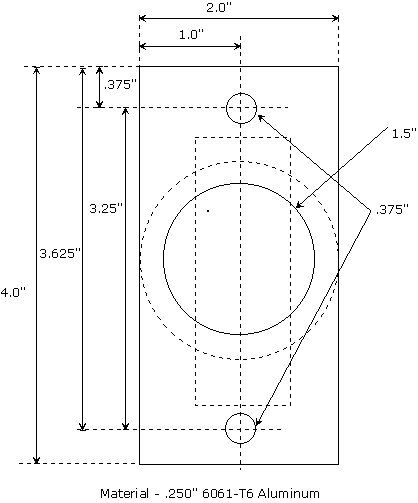
After the part is complete chamfer all corners and relieve all burs.
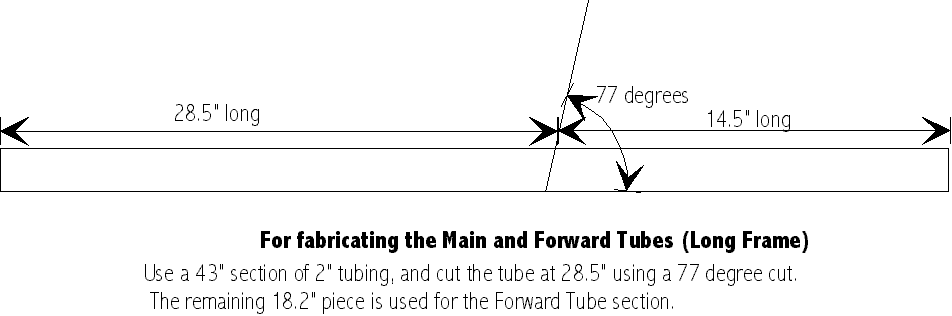
Cutting the Main and Forward Tube
Before getting involved with cutting and mitering the tubes, there is an alternate method that involves bending the tubes. This method reduces cost, errors and time. Check it out by clicking Tube Bending .
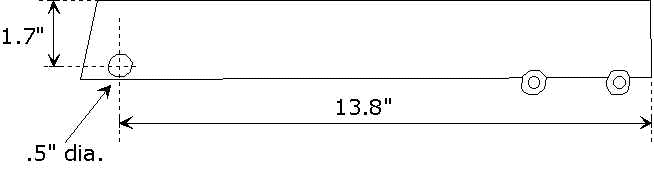
The Main and Forward Tube are fabricated from a 43 inch section of 2-inch tubing. This section of tubing is cut as illustrated below.
Fabricating the Seat Tube
The Seat Tube is fabricated using a 2-inch diameter tubing that is >12 inches in length. As with all 2-inch tubing specified, the wall thickness for this tube is .065" (16 gauge). The tube is mitered on one end using a two-inch hole saw to reduce the length to 10.8 inches. The mitered angle of this cut is 66º.
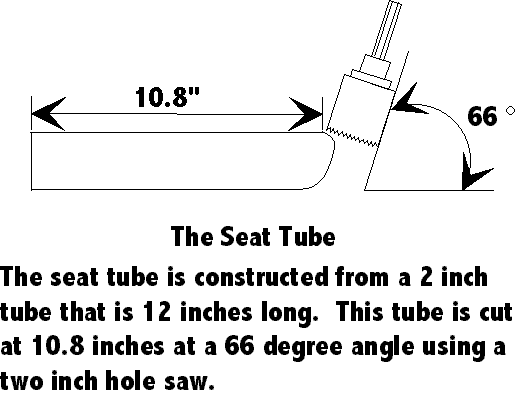
To finish this Seat Tube assembly we need to make provisions for the chain pulley mount. To accommodate this mount, a .5" hole is drilled into the seat tube 90° from the orientation of the 2-inch miter. The exact placement of the hole is 9.8 inches measured from the non-mitered end and at dead center of the tubing. The .5" hole should pierce both tube walls.

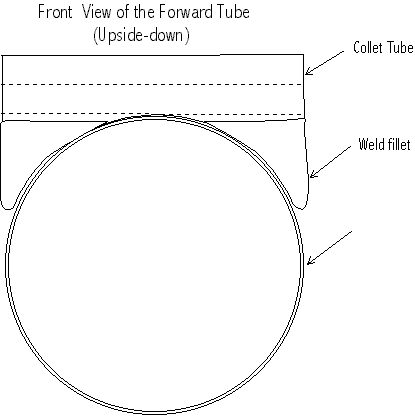
Preparing the Forward Tube
The forward section requires the placements of two pinch collets. These pinch collets are welded to the forward tube as shown in the series of drawings below.
Note
Prior to any welding clean all weld affected areas with a Stainless Steel Wire Brush
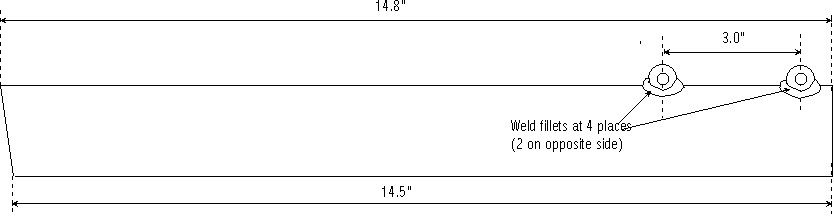
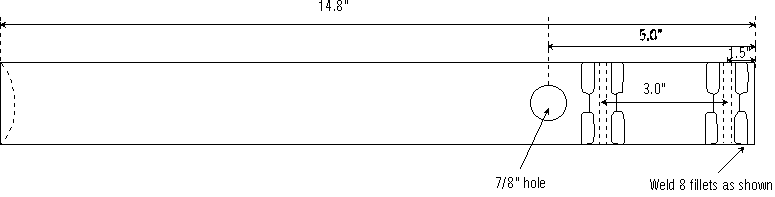
Upon welding, a 7/8-inch hole is drilled 5 inches down the tube as shown in the above drawings.

After the 7/8-inch hole has been drilled, a .5-inch trough is cut all the way to the end of the forward tube. This trough allows the collets to constrict freely. Refer to the above illustration.
If the alternate cross member design is desired, than the forward Chain Idler Mount must be attached to the Forward Tube as shown in the illustration below:
Welding
All tube ends must be prepared prior to welding. Using a file or a sander, bevel all tube edges to allow a sizable fillet weld. Insure that all joints are flush and are free of contamination. Using a wire brush, clean all tube ends just prior to welding. An oxide forms on aluminum after an hour. Therefore, it is important to perform this step immediately before welding.
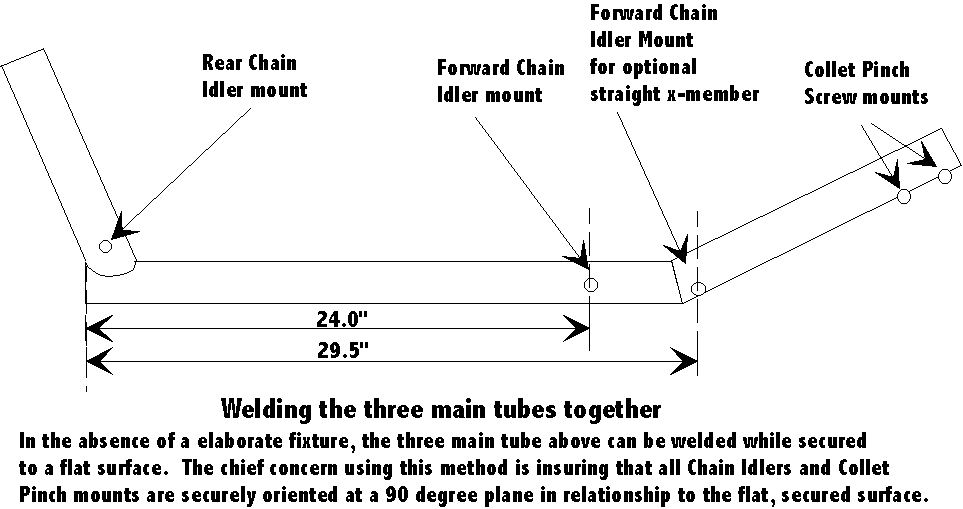
Take the Seat, Main, and Forward Tube assemblies and situate them as shown below. The Pinch Collets and Chain Roller Mounts can be used to anchor the tubes to a flat surface (e.g., 3/4" plywood). This practice insures that all tubes maintain proper geometry during welding. If a wooden surface is used for fixturing the tubes, drill or router-out the wood adjacent to the welding area making sure the wood does not obstruct the welding area.
A solid fillet should be welded around the entire circumference of each tube.
Note
Prior to any welding clean all weld affected areas with a Stainless Steel Wire Brush
Welding Tip
It is recommended that when welding around a perimeter, a series of tack welds should be used. Each of these tack welds should be placed at 90 º from each other (four each).
Drilling the Pulley Mount
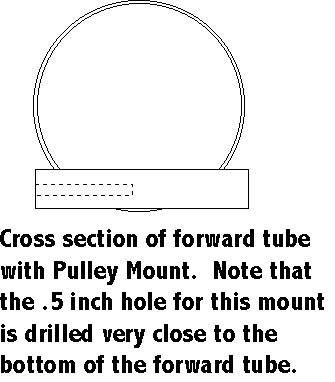
Upon welding the three main tubes, the Pulley Mount holes are drilled. If the 114° cross-member frame is to be made, this 1/2-inch hole is drilled 24 inches as measured from the aft main tube forward. The hole is placed dead center and goes through both sides of the tube. If the 90° cross-member frame is desired, the 1/2 inch hole is drilled 29.5 inches as measured from the aft main tube forward. As shown in the above and below drawings, this hole is located on the forward tube near the bottom extreme of the tube. To drill this 1/2 inch hole through the bottom extreme of the tube is challenging. However, it can be best accomplished using a 1/2- inch hole without the pilot.
Below is a cross-sectional view of the 90° version of the forward pulley mount and hole.
Drilling the Chain Stay Reliefs
The Chain Stays collect on the aft end of the Main Tube. To insure a maximum surface joint between the two parts, a 1" 180° relief is cut into both left and right sides of the main tube. The results should appear as drawn below:

Installing The USS Steering Mount
If USS steering is desired, a hole must be mounted on the main tube to accommodate the 'U' bar steering handle mount. A 5/8" hole is drilled vertically through the frame 12" forward from the front of the seat tube. It is important that this hole be drilled straight downward, as it can impede the steering of the trike. Refer to the drawing below for proper placement of this hole:

Insert the Steering Mount into the 5/8 hole drilled. The tap side of the mount should be facing upwards. Using a SS wire brush, clean all surrounding areas in preparations for welding. The steering mount should fit flush on the bottom side of the frame, while the top should have 1/4" of the mount extending past the top of the frame. Weld a 360° bead on both top and bottom sides.
Welding the Cross-member to the Frame
Attaching the cross-members is the hardest part in building the Thunderbolt. In order to accomplish this task, a frame fixture must be built for proper alignment.
Refer to the drawing below for building this fixture.
Using the fixtures above, adjust the right and left cross-member for an exact 23° as referenced to the fixture base. Additionally, insure that both Seat Tube and Forward Tube maintain a perfect right angle to the fixture base. If possible, take your time to recheck the geometry of your setup. The cross-members should be 20.3" from the rear section of the Main Tube assembly. For the 90º cross-member version, this length is 25.2" from the rear section of the Main Tube assembly.
Note
Prior to any welding clean all weld affected areas with a Stainless Steel Wire Brush
Once the proper alignments and angles have been achieved, the cross-members are ready for welding. A solid fillet should be welded around the entire circumference of each cross-member tube.
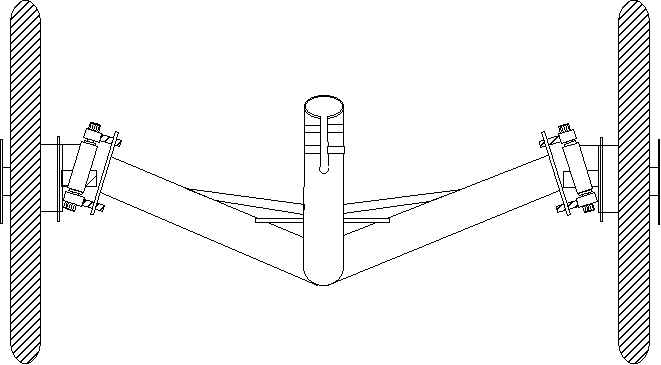
Attaching the Knuckle Faceplate to the Cross-Members
Attaching the faceplates to the cross-members is a complicated task, as there are several geometry concerns. To ease some of the confusion, this explanation is included below.
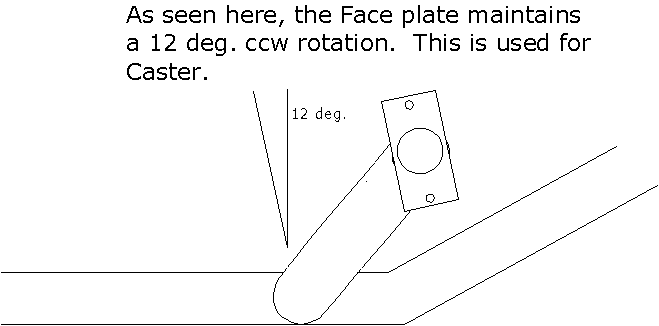
Looking at a side view of the trike, the faceplates tilts back at 12° to give the suspension adequate caster.
Looking forward, the bottom of the faceplates lead outwards by 16°. This angle compensates for the kingpin inclination. See the drawing below.
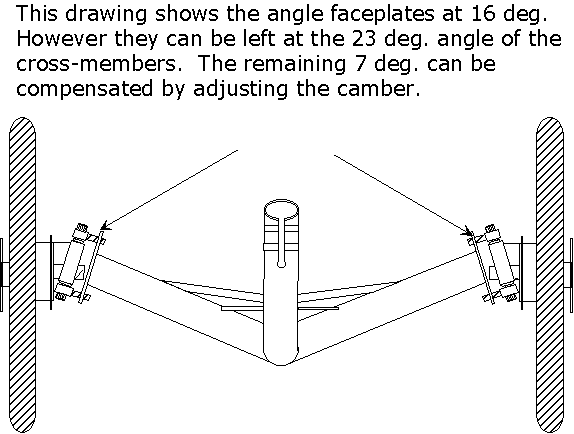
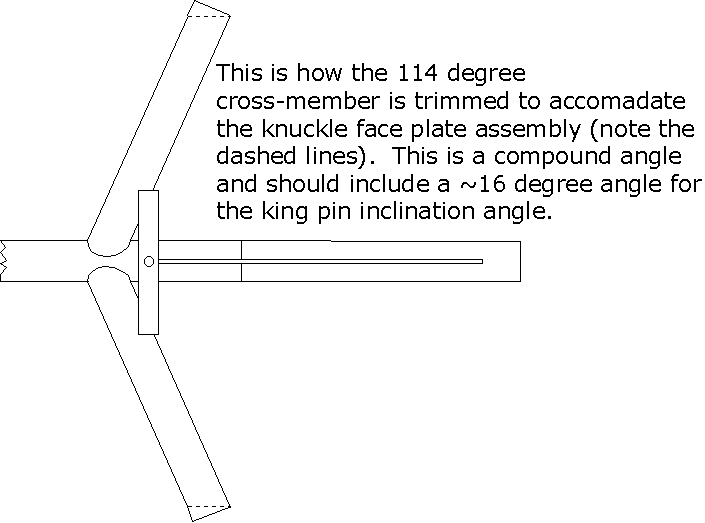
For 114° Crossmembers
The 114° Crossmembers require the ends trimmed so that the knuckle face plates run on a parallel plane to the main tube. Refer to the drawing below for a visual explanation.
Note
Trimming the 114° crossemembers requires a compound angle. Not only does this angle allow the face plates to run parallel the main tube, it also adds the 16° angle needed for the King Pin inclination.
Before welding these assemblies to the cross-members verify all geometry specs on the cross-members. Insure that both cross-members are equal length, that they both tilt at 23° and that the tube ends are consistent with each other. Adjust as needed.
When building the production thunderbolts, special jigs were used to align these parts. However, these are impractical for the home builder. Therefore, it is up to your own ingenuity to figure a way to align both of these faceplates. A straight piece of flat wood or metal 36" long can be used to align both faceplates by situating it against the front leading edges of of both faceplates. This would insure that both assemblies are aligned the same.
Note
Prior to any welding clean all weld affected areas with a Stainless Steel Wire Brush
Once the parts are secured in place it is time to weld them to the cross-member tubes. The weld bead should run the complete 360° circumference of the tube. When the first one is completely welded, check it against the the other so that last minute adjustments can be made.
Welding the Front Seat Mounts to the Frame
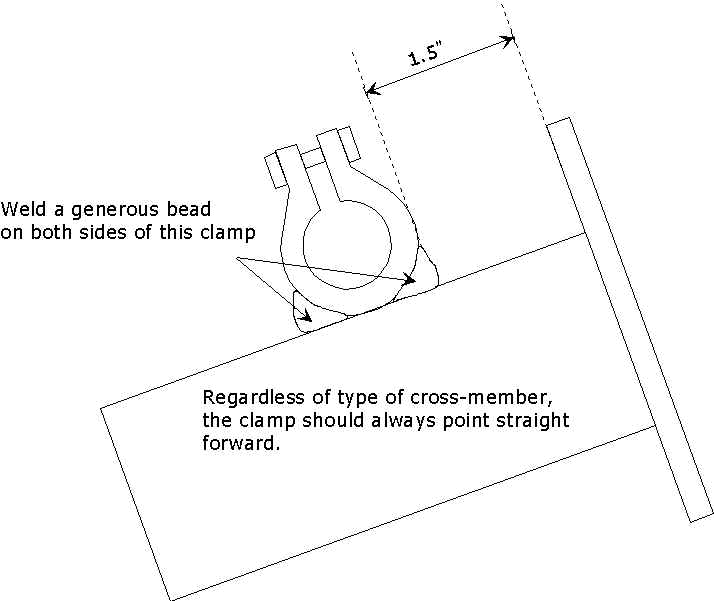
The front seat tubes are mounted on top of each of the cross-members using a BMX style 7/8" seat post clamp. The clamp is situated as shown below:
Note
Prior to any welding clean all weld affected areas with a Stainless Steel Wire Brush
Prior to welding these clamps to the frame, insure that they both are pointing straight forward and directly on top of each cross-member. When welding, insure to use a generous bead around both sides of each clamp.
The completion of welding the faceplates to the cross-members finishes this section. In the next section, we will fabricate the web gussets. As for the OSS Steering Mounts, this is covered in the next section.