Chapter 7, Part 3
Constructing the Web Gussets
Version 1.1
Written by Rickey M. Horwitz
Notice
The material contained in this section is protected by U.S. copyright laws. Any unauthorized duplication or publication of the material contained in this section is prohibited by law.
Introduction
All web gussets used on the Thunderbolt (with exception of the 114° cross-member gusset) are fabricated from .125" 6061-T6 Aluminum sheet-metal. For vehicles undergoing heat treatment, the thickness of these gussets can be reduced to .065". As mentioned, these gussets make the trike frame incredibly strong and stiff and are strongly recommended. Additionally, these structures increase the reliability and longevity of the frame.
Hardware Required
Tools Required
Gusset Fabrication
Forward Tube Web Gusset Fabrication
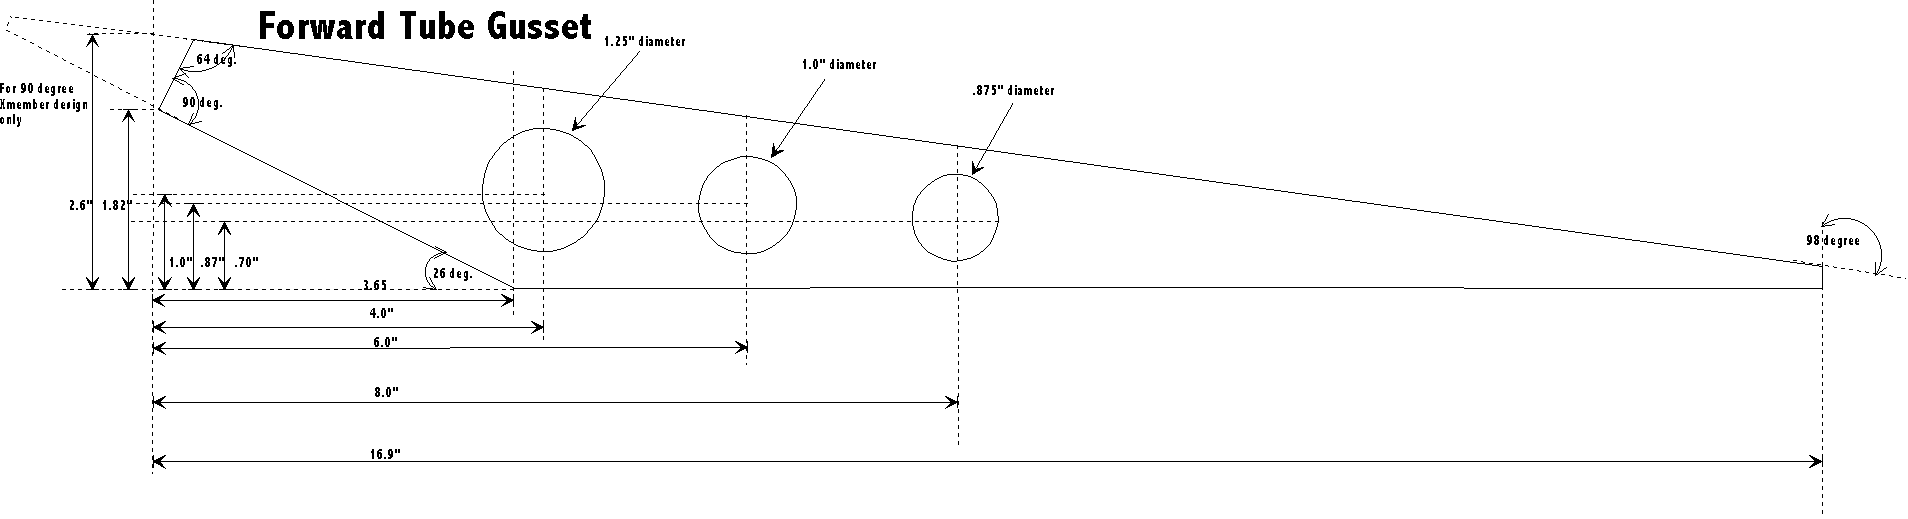
The drawing for the Forward Tube Web Gusset is shown below. Because this piece is relatively large and requires several dimensions, the illustration below is shown at 50% scale. For full scale viewing, use your browser to select the image and zoom-in.
For the 90 degree Cross-member Trike Design, the Gusset is extended by an inch as shown.
90° Cross-member Gussets
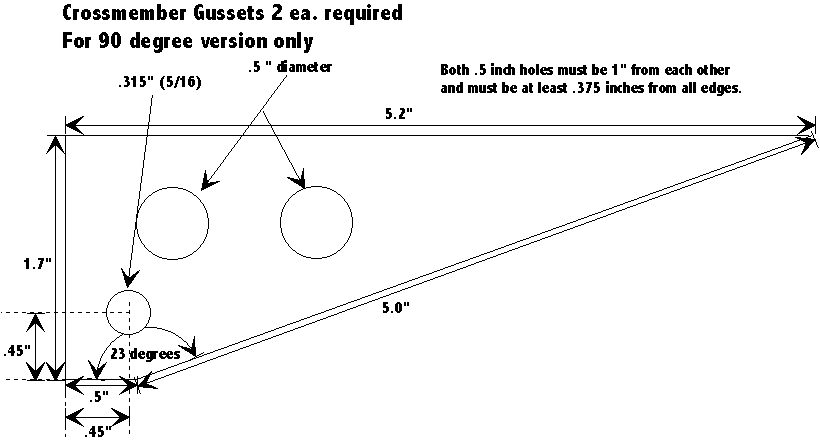
The Cross-member Gussets intersect the Forward Tube gusset at 90° on both left and right sides. This intersection coincides with the cross-members. Two Cross-member Gussets are required for both left and right sides. Refer to the drawing below:
114° Cross-member Gusset
The 114° Cross-member Gusset is actually a piece of 1 inch, right-angle .188" thick aluminum stock. Refer to the drawing below. The .5 inch hole is only required if the OSS Tiller steering system is used. Otherwise ignore this hole.
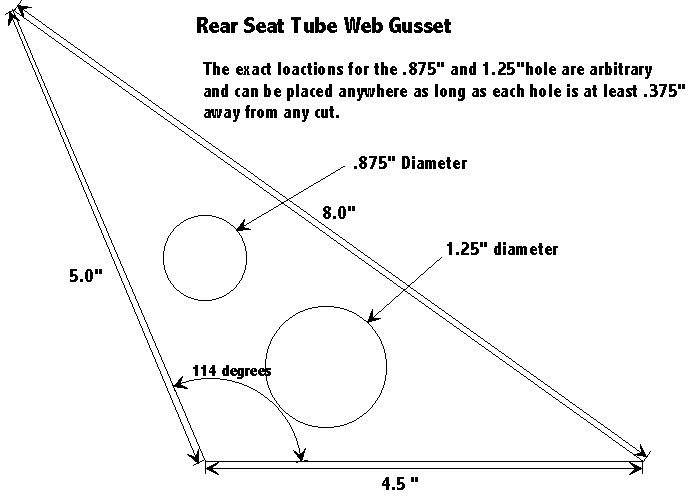
Seat Tube Web Gusset
The Seat Tube Web Gusset is shown below at a 1:1 ratio. This Gusset is used for all Thunderbolt variations. Note that the exact hole locations have not been rendered. These holes are arbitrary and can be placed anywhere as long as there is at least .375" or more distance between the hole and any ends.
Fixing the Gussets to the Frame
Rear Seat Tube Gusset
The Rear Seat Tube Gusset is the easiest gusset to install and it is common for all configurations. Therefore, we start with it first. Situate the gusset as shown below. Insure that it is properly aligned, and that both angles are cut properly for a flush fit. The weld bead between the seat and main tube will prevent proper fitting of this gusset. Consequently the 114° corner shall require some chamfering to allow proper fit. When the gusset fits flush on both seat and main tubes, it can be fixed in place for subsequent welding. However, prior to fixing in place, prepare the general area (both gusset and a 1" perimeter surrounding both seat and main tube) by scrubbing it down with a stainless steel brush.
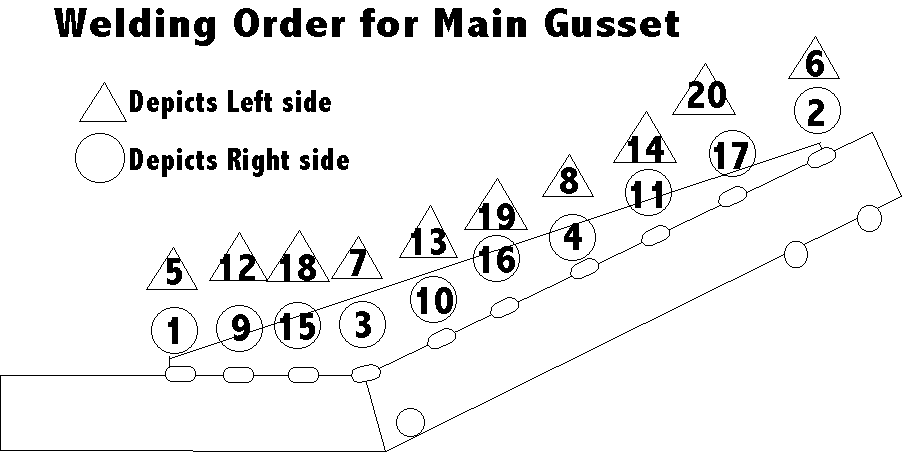
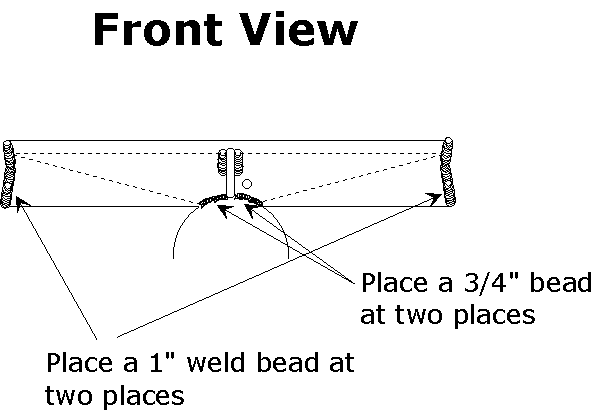
Assuming the frame is properly grounded to the welder, the gussets are ready to be welded to the frame. In order to conserve weight and prevent distortion, a continuous bead is not recommended. A 3/4" bead is welded at specific areas. Initially, a 3/4" weld bead is placed on each end (one on the seat tube and one on the main tube) on one side only. Next, weld a 3/4" bead in the gusset corner. This weld should be shared between both sides as to make it symmetrical. Next, inspect the gusset for warpage and straighten as needed. On the opposite side, place two 3/4" beads as shown below. Place identical weld beads on the opposite side of the gusset. This means that a total of five weld beads per each side or ten total. Upon completion, check for any subsequent cracks in any of the welds, re-weld and check as required.
Note
Before proceeding, you must know what type of steering arrangement that is to be employed on your trike.
90° Cross-member Configurations
The forward, left/right cross-member gussets are required for this configuration. For Under Seat steering, this work is minimal as the forward tube gusset is intact as it interfaces both left and right cross-member gussets. For the Over Seat Steering configuration, the main gusset interfaces with the Bell Crank mount. This requires slight modification of the rear of the main web gusset so that it can accommodate this mount.
For USS Configurations
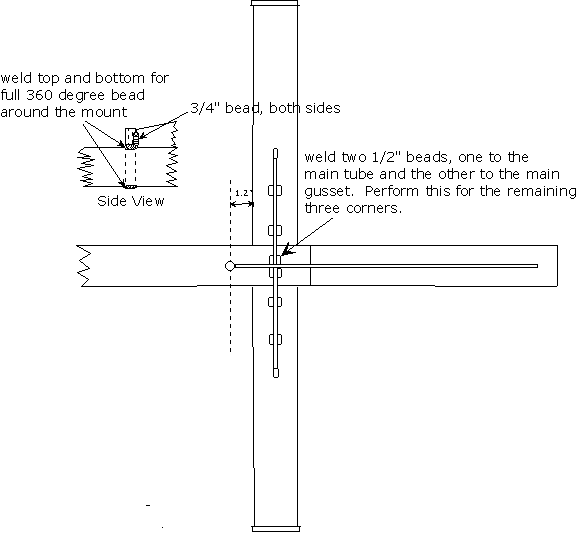
The forward tube gusset 26° corner must be chamfered so that it can accommodate the weld bead connecting the main and forward tube sections. Upon chamfering, place the gusset onto the frame. Insure that all surfaces are flush, if not file down to proper size or angle. Once proper fit is achieved, pre-weld preparations must be made. Using a stainless steel wire brush, scrub the entire gusset assembly and both forward/maintube in the areas where the gusset shall be placed. Situate and align the forward gusset so that it appears as illustrated below. Hold in place for welding. Place Assuming the frame is properly grounded to the welder, the gussets are ready to be welded to the frame. In order to conserve weight and prevent distortion, a continuous bead is not recommended. A 3/4" bead is welded at each end (one on the forward tube and one on the main tube) on one side only. Place a 3/4" bead weld at the forward tube/main tube junction (the gusset's 26° corner). Check the gusset to insure proper alignment. Use the drawing below to place the pattern of remaining weld beads.
Note
If the OSS configuration is required, the Bell Crank Mount must be installed first. Refer to the applicable section for details.
Welding on the 90° Cross-Member Gusset
Situate the cross-member gussets so that both assemblies are situated on the mid-section of each right/left cross-member tube as shown below:
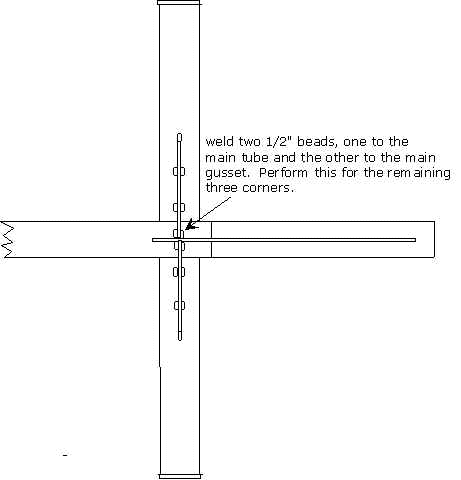
Place a 1/2" weld bead at the outside ends of both cross-member gussets. Place another 1/2" bead in the inside so that the bead contacts cross-member gussets and the main tube. Do the same for the opposite side. Inspect both gussets for proper alignment, and adjust as required. Place a 1/2" weld bead at each corner of the main gusset and cross-member gussets; a total of four is required.
Caution![]()
Thin sheetmetal melts very quickly. Weld with extreme caution!
Place two more 1/2" beads between the ~5.5" length section. Upon completing both gussets, place another two weld beads on the opposite sides. The finished assembly should resemble the drawing below.
For OSS Configurations
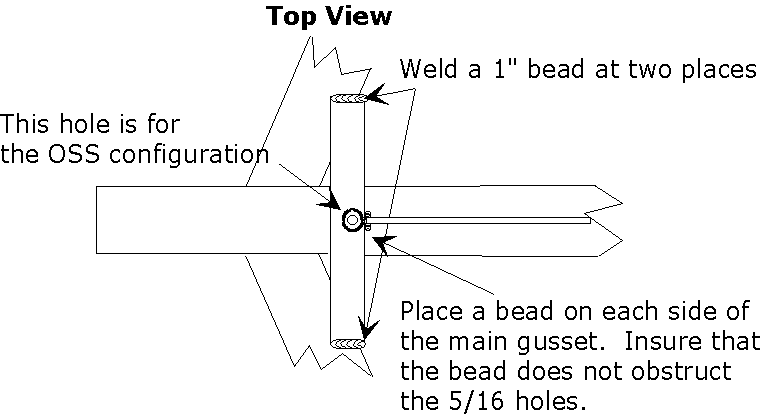
The only difference for OSS configuration is that the rear of the main gusset is shortened by 1.5 inches. This shortened distance allows the installation of the Bell Crank mount. The bell crank mount requires a 1/2" hole be drilled in the frame as shown in the drawing below. The 1/2" hole must be drilled and the mount welded to the main tube prior to installing the main web gusset.
Caution
Insure that the 1/2" hole is aligned directly at 90°
114° Cross-member Configurations
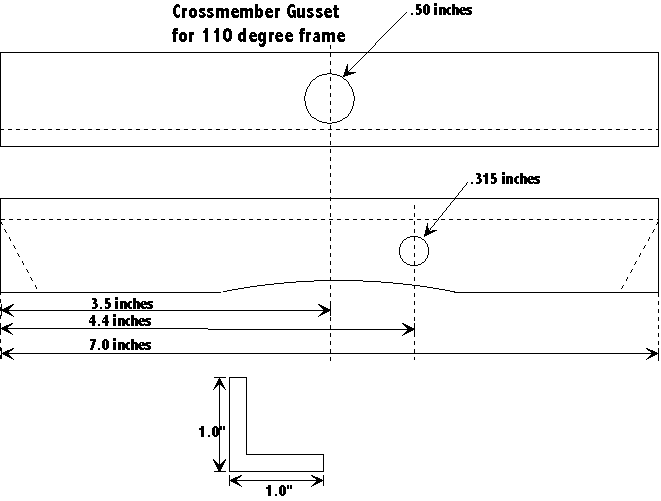
The fabrication of the main web gusset is almost identical to that of the 90° version. The major difference is that the 114° version uses a single 7"x1" angle extrusion for the cross-member.
If an OSS configuration is desired, the bell crank mount must be installed before any of the gussets are fastened in place. Other than this, both OSS and USS configurations are identical.
Note
For the 114° Cross-member configuration, the main gusset below is shortened slightly to accommodate the Cross-member. Consequently, welds 1 and 5 are omitted.
The exact configuration and locations of the web gussets appear as drawn below.
Weld the main gusset as shown in the drawing above. For a procedure on welding this assembly, refer to the 90° assembly section. Remember that the main gusset is slightly shortened to accommodate the cross-member gusset.
For USS Configurations
For the Under Seat Steering only the Cross-member gusset needs to be installed and welded. This part is a pre-shaped 1"x7" angle extrusion. Situate this part so that it fits as shown above and below. Weld it to the frame as per instructions in the drawings below.

For USS Configurations
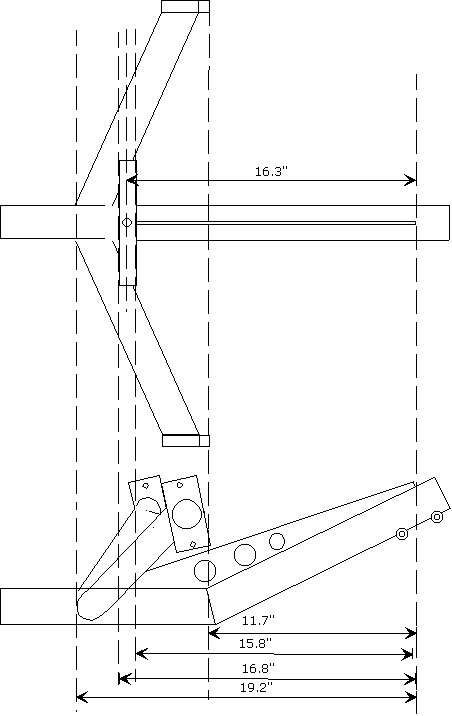
Instruction for OSS configuration require the addition of a bell crank mount. This requires drilling a vertical .5" hole through the frame. This hole is placed 16.3 inches behind the front tip of the main gusset as shown.
Caution
Insure that the 1/2" hole is aligned directly at 90°
Insert the bell crank mount into the freshly drilled hole. Insure that the threaded portion of the mount faces upwards. The bottom mount should be flush with the frame. Weld the bottom mount to the bottom of the frame by welding a 360° bead around the entire joint. At the top, a one inch section of the mount should be exposed. Again, weld a 360° bead around the entire joint. Situate the Cross-member gusset to the frame. For secure fit, file as required.
Weld the cross-member gusset as shown in the drawings below: